Showing posts with label food. Show all posts

Friday, 20 September 2013

Molly's Magic in the kitchen


Kitchens are magical places. 

In my kitchen I turn milk into cheese and yoghurt, flour into bread and pasta and water from the tap into tea, coffee or soup. 

My kitchen is where the veggies grown in my garden become yummy meals or are preserved for another time of the year. 

Curds and whey.... from milk, I make cheese
Delicious sweet treats, gifts made with love, soap, cleaning products, herbal remedies, beer and cider are all made from basic ingredients in my kitchen. 

Even before I cooked everything from scratch, my kitchen made a mean vegemite on toast and a cup of tea. 


Tortillas + kids = crazy gnomes in a family kitchen.
But the magic doesn't stop there, kitchens are also places where family magic happens. It's the place we come together around the table and plan, console, laugh, cry and grow as a family. When we first moved here, my kitchen was the home of two high chairs, where our baby boys would eat (throw, mash) their first tastes of a range of foods. I've stood in our kitchen and chatted to countless friends and family members and have wonderful memories of them all. And these days, since our kitchen renovation, my kitchen is filled with so much of us - benches, cupboards, curtains, rugs and shelves that we made with our own hands. 


Delicious food and warm memories are made in our kitchen
Everything about our kitchen is magic, and now, our magic kitchen has a cauldron. A vessel that I throw ingredients into (following instructions in a book or making it up as I go) and, like magic, they turn into terrific meals!  I feel like Mrs Weasley as I walk away to deal with animals/kids/a husband who had a bad day at work while my thermomix chops, sautés and stirs my food.  It's still cooking from scratch, but with so much more power!  


Molly has settled in very nicely....
I've had the thermomix for less than a week, and already I've used it for so much, making at least two recipes (or part recipes) in it each day. Many of them I could make without the thermomix, but some that I couldn't - freshly milled flour from whole wheat or rice, icing sugar and mayonnaise (I know, lots of people make mayo without a thermomix, but I've tried about 6 times and failed). But everything is easier with it. 

The first meal I cooked using the thermomix - Delicious, slightly spiced lentil burgers served in fresh bread rolls made with 50% freshly ground soaked/sprouted wheat with fresh salad from the garden - YUM!

So as a tribute to the magic of kitchens, and that brilliant mother and witch, Mrs Weasley, I'm naming my little magic cauldron, Molly.
Molly Weasley - a bit of magic in the kitchen!
 

Monday, 2 September 2013

The Great Wright Family Bakeoff!

Last week we watched the finale of The Great Australian Bakeoff. We got right into watching the show, which is quite unlike us - we usually don't go for reality TV. I'm not sure what it was about this show that hooked us - it could've been the delicious things they baked through the series, or maybe the corny jokes the host Shane Jocobson liked to crack, maybe it was the cruel judging reminiscent of country shows, or perhaps it was the gorgeous vintage décor (seriously, bunting made from vintage Australiana tea towels - too cute). Whatever it was, this reality TV meets the CWA show had us hooked enough to record it for the kids each week and watch it all together.

We loved it so much that we decided to have our own bake off - a muffin bake off. 

Last week, all for of us submitted a muffin flavour so that I could shop for any special ingredients. Then, yesterday morning (after brief Father's Day celebrations), we set up our kitchen for the baking. 

I supplied a basic muffin recipe, and each of us followed that recipe with our own flavours and variations. 


Stu and Jamie went first. They chopped, measured and mixed until they put their trays of muffins in the oven. Then it was mine and Lachie's turn to start baking.
 

Two hours later, 46 muffins had been baked and cooled and we'd each selected our best three to present for judging. 

Jamie presented some beautiful Jaffa muffins - flavoured with fresh orange juice and zest and dotted with chocolate chips. 

Lachie created a family favourite - chocolate, choc chip muffins. He added a few special caramel choc chips to the top of each and presented them beautifully on his choc chip leaf plate. 

Stu's muffins stole the show for looks - raspberry white choc muffins presented in a snow storm of grated white chocolate. 

And I tempted us all with the scent of warm cinnamon sugar with my jam donut flavoured muffins - a spoonful of strawberry jam in a lightly spiced muffin topped with melted butter and lots of cinnamon sugar. 

Tasting and judging was rather fun - I think the fact that we all got to eat our creations made us all winners!  But the judging was close (and sometimes harsh!), but there was a clear winner - Jamie's Jaffa flavoured muffins. 

Gotta say, I was very impressed with everyone's efforts. Every batch was moist and delicious. 

Lots of fun, with the bonus of a freezer full of muffin deliciousness for the week ahead's lunch boxes. It was such good family fun that we're already planning our next bakeoff......

~~~
 
Our Basic Muffin Recipe

  • 1 1/2 cups SR flour
  • 1/4 cup sugar
  • 1 egg
  • 3/4 cup milk
  • 2 tbsp. oil
  • + flavourings of your choice
(try cocoa and choc chips, replacing some of the milk with orange juice and adding choc chips, spices and jam or white chocolate and berries)

  1. Mix together all of the dry ingredients in a bowl.
  2. Mix wet ingredients in a measuring jug.
  3. Add wet ingredients to dry and mix until just combined (don't over mix or you'll make tough muffins!).
  4. Spoon mixture into muffin cups until about 1/2-2/3 full (we made 10-12 muffins with each batch).
  5. Bake at 200C for 15-20min until lightly browned and springy.
  6. Cool, decorate and serve.

Friday, 30 August 2013

Eating from the garden in late winter

Colour in the winter garden - beetroot, calendula and brocoletti flowers
Two years ago, if someone had told me that I would be able to eat veggies from my garden all through winter, I wouldn't have believed them. In the past, the only thing harvested in my winter garden was the silverbeet that had grown into a massive plant. I still have a long way to go in my winter gardening (no lovely heads of purple broccoli or cauliflower for us still), but now I can see the possibilities!

Snow peas in hanging baskets - snail and duck proof!
This winter promised lots of lovely silverbeet and peas, but my ducks put a stop to that. Instead, we've eaten great heaps of wombok cabbages, enough lettuce and rocket for salads and burgers, good supply of carrots, baby beets, some lovely stalks of brocoletti, the odd bak choi and masses of crisp and delicious celery. It's all been topped with the herbs that have kept going, and served with some of my summer preserved and frozen veg. It's not enough veg for us - I've still had to buy the odd pumpkin, frozen peas and bags of potatoes - but every day we eat something from our garden, and that feels very good indeed. 

Broad beans in flower promising more fresh veg soon.
Last night was a good gardeners meal. I made rosti with potatoes and a selection of fresh turnips, carrot, celery and herbs from the garden. They were served with new season eggs from our chooks (thanks girls!), sourdough toast, tomato chutney and the first few snow peas from my hanging baskets (ie. duck proof pea gardens!). It's a simple meal, but it tastes so good to eat all of those home grown and homemade items, knowing exactly what went into everything on the plate. 
Delicious!

With a bit of luck (and my planning paying off) and we'll continue to eat from the garden all through spring to make it a whole 12 months of garden consumption - yay!

Pretty purple and white turnip tops.


Thursday, 22 August 2013

The evolution of our bread

I'm very pleased to say that I've been baking nearly all of the bread we eat for about 18 months now. And I've come a long way from those first (barely edible) loaves.

I initially started baking our own bread, not for the health of taste benefits, but for the waste reduction. It was back in the beginning of our 12 months of greening, and I was determined to reduce the amount of rubbish in our bin each week. Plastic bread bags and tags became a pet hate and so I set about replacing them with recyclable, paper flour sacks. 

Over the first few months, I perfected my baking, and eventually had a recipe of my own that consistently churned out delicious bread and rolls for my family. Everyone was happy.... And then I realised how often I was buying yeast and began to read about how much healthier sourdough is..... 

I figured it was worth a try. For me, the idea of growing my own yeast at home just made sense, and the idea of a bread(which we eat a lot of!) that was better for us seemed a worthy goal. So a couple of months ago, I made myself a sourdough starter. 

Ten days after mixing that first batch if flour and water, I baked our first loaf. I wish I could say that it was fabulous, but it was reminiscent of those first loaves of bread (ie. barely edible). So I tried again. The boys offered support - they too remember that I had a bad start with regular bread- but I knew they were longing for a loaf of my old bread. 

After the third loaf, things were improving, but I wanted a change, so I tried these sourdough tortillas.  They were easily the best tortillas we have ever eaten - hooray!  The sourdough culture was now smiled upon by all. 
Our latest triple batch of sourdough tortillas.

I kept trying with the bread, different recipes, techniques and tweaks, and eventually, I found my own recipe, an adaptation of this one. It's not quite as easy as the bread recipe I was using before, but it uses ingredients I'm comfortable with, fits my routine and makes delicious bread for the whole family. Like my old recipe, one batch makes a loaf and a dozen rolls for lunches of a couple of large loaves, so it saves on time, power and effort. 

It's not too sour (even though I don't use the baking soda as the recipe suggests), which is a good thing for a family loaf, and so long as I get a good rise in the first proving, it is lovely and soft.  The kids are happy to have the bread bin full of deliciousness again, and I love that I no longer have to buy yeast and that the bread is just a little better for us again (a far cry from nutritionless stuff I used to buy from the supermarket!). 
A soft and delicious sourdough sandwich loaf.

And to make a good thing better, we've discovered some of the other wonderful things I can make with sourdough starter!  English muffins, crackers, donuts and a choc orange cake have been tried and the tortillas are a weekly event. For Stu's  birthday, I experimented and created a sourdough hummingbird cake which was amazing!  I'll share the recipe soon. I'm looking forward to trying pancakes and croissants one day discovering more sourdoughy goodness. 

I'd love to lay out a timeline of our breads evolution - from supermarket bread to now. And I'm looking forward to the next chapter that I hope to attempt in the next year - home ground flour for my bread....

Wednesday, 19 June 2013

Living in the season {and cake too}

I have a bit of a pet hate - heating to summer temps in winter and cooling to winter temps in summer. There is a (large) collection of people who turn thermostats on heaters to 30c through the winter just so they can get about in a tshirt. The same people, undoubtedly, switch on the aircon if the temperature goes over 25c in summer. Grrrrr.... Makes my blood boil!

There's none of that in our house. We probably swing to the opposite extreme. Our centralised system is broken, so we only have room heating and no air con. 

Right now, it's the middle of winter here and it's pretty cold. It never gets cold enough to snow here, but we get a mean frost. We had one this morning that froze everything in sight. This morning, we turned on the heater, but its the first time we've used it in the morning all week. Most mornings, we climb (begrudgingly) out of our toasty warm (thanks to flannelette sheets and good blankets) beds, toss on dressing gowns and slippers and make a warm drink straight away.  Stu and the boys go off to their tropically heated work and school, and I stay here - dressed for the weather. During the day, I wear layers, a singlet and warm socks, a beanie, scarf and fingerless gloves. I wear them inside and out. When I venture out for my morning and evening jobs, I add a coat and boots. The boys follow this dress code on the weekend. 

Do I heat the house in the day?  Depends. If I am running around doing housework, baking with the oven going or in and out all day, then no, I don't. If I'm sitting in one spot sewing or working at the computer, or if I have guests, then I heat the space I'm in. We also heat the kitchen for our evening meal and the lounge room after tea. 

When watching tv or crafting or playing games at night, we use the heater on low. We also use blankets on the couch, and often reach for an extra layer or beanie. 

Hot water bottles are used for warming beds, or on chilly nights to curl up with on the couch. Hot drinks are used frequently, by all of us, to warm from the inside. 

We live like its winter. 

We eat like its winter too. We don't eat fresh tomatoes, zucchini, corn or stone fruits despite the fact that we love them. We'll love them even more when summer comes back. We eat seasonal veggies and fruit and preserved versions (tomato chutney gives that red, tomato-y kick to a sandwich!). 

Porridge is a breakfast favourite, and on days like today, I'm inclined to whip up a bowl of this nutritious, delicious cheap and super warming goodness for lunch too. 

We are eating a lot more soups and curries too. Warming and made from seasonal and preserved foods. They go beautifully with fresh bread (which incidentally warms the house while it cooks). 

My chooks are on their winter holidays, so eggs are off the menu. We still buy the odd dozen free range eggs (preferably local), but I only use them for baking, and choose egg-lite recipes. 

From the garden we're harvesting lettuce, beets, carrots, delicious celery, brocollini and herbs, with wombok, pak choi and kale not far away. These are the basis of most of our meals. We're also harvesting lemons, lots of juicy lemons. 

Tonight, I made a delicious, season friendly, eggless lemon-yoghurt syrup cake.  It was very very easy - kid friendly in fact.  We served it warm with a drizzle of cream and it made a fabulous dessert for us and my brother - very moist and with that fabulous tang that only lemons can give. Yum!

Eggless Lemon-Yoghurt syrup cake. 


  • 220g plain flour
  • 200g sugar
  • 3 tsp baking powder
  • Juice and zest of 2 medium (juicy) lemons
  • 250 ml natural yoghurt (homemade preferably - my 'recipe' is in this post)
  • 1/4 cup vegetable oil of your choice
  • 1/4 tsp salt
  • Juice of a third lemon (for syrup)
  • 3 tablespoons of sugar (for the syrup)
 
  1. Preheat oven to 180 degree C and grease and flour a pan (I used a 20cm round tin)
  2. In a medium-size bowl sift the flour, baking powder and salt. 
  3. In a separate bowl, whisk the yoghurt and sugar well, till sugar dissolves completely. Then add the zest and juice of lemons, whisk till mixed well. This forms the wet ingredients.
  4. Mix your two bowlful a together until we'll combined. 
  5. Finally, fold in the oil till it is completely incorporated.
  6. Bake at 180 (or 160 if your oven is too hot like mine). degrees for 50 minutes or do until a toothpick inserted comes out clean.
  7. Meanwhile, make a syrup using the juice of another lemon and 3 tablespoons of sugar. Mix together in a saucepan and stir over medium heat until the sugar is dissolved. 
  8. When the cake comes out of the oven, leave it in the pan and stab it numerous times with a skewer. Then slowly pour over the syrup, allowing it to soak into the cake. 
  9. Let the cake sit for at least ten minutes to soak up the syrup and then serve. 

I wish I could tell you what it tastes like cold, but it was all scoffled up warm for dessert... I guess I'll have to make another while the family isn't home. 


Sunday, 28 April 2013

Not a butcher

Remember these guys?

Well they grew up. They grew up into beautiful big roosters of various colours. They were quite friendly and lived peacefully in a bachelor coop with younger roosters that have gradually come to join them. I enjoyed raising them, but as was always the intention, the time came for them to be processed into healthy, lean, almost free range and extremely low food miles meat for our freezer.

We've processed a few batches now, and we're getting better at it.  Each time, we learn something new and do the job cleaner, quicker and with less waste.

The adjustments we made to the process this time were to put each of the roosters (three this time - two of ours and a donated Rhode Island Red), into an empty feed bag each when we caught them. Previously we've just put them all into a box and once we had one escape and had to chase him round the backyard - not conducive to stress free meat! By placing them in the dark bags, they stayed still and calm until their turn came. We only ever catch then when we are completely ready, so they are in the bags a maximum of 10 minutes.

The other change was to add a few drops of dish detergent to the scalding water we use before plucking. I don't know if it helped - the first two were relatively easy to pluck, but the third one wasn't. I think the water was too cold, but basically, he ended up skinned instead of plucked. This seemed like a bad thing, but ended up good.

Now I'm not a butcher, and I actually don't like handling meat, but I believe humans should be omnivores, I believe we should eat humanely raised and killed meat and I am the only one in our house likely to do any butchering.  So I set to preparing our roosters for the freezer. Previously, I've just cleaned them all up and frozen them whole. And previously, we've fed the necks to the dog, but all the feathers, guts etc have been thrown out. Not this time. This time, we reserved the necks for Buddy, I have frozen the livers in a container to become pâté when we have enough (I'll add more each time we do this) and the guts and feathers were buried near one of our fruit trees to act as a blood and bone fertiliser.

The rest of the chicken, I brought inside. The Rhode Island Red was plump and lovely looking, so after a clean, he was left in tact to become a roast. The other two were not so 'roast chicken' looking, so I had a go at jointing them. I can't say I ended up with the neatest cuts of meat, but I did put a bag of skinless/boneless breast fillets, a bag of skinless/boneless thigh fillets and a bag of legs and wings into the freezer. Then, not wanting to waste anything, the carcasses went into the crock cooker with a couple of litres of water for two days. Yesterday, I strained it, picked the remaining meat from the bones and gave the bones to the chooks to pick at (that made me feel weird, but I didn't want to just throw them out! Besides, they do eat meat scraps from the chook bucket usually....).

The scraps of meat were added to a pasta dish last night, and the stock filled three large mason jars, which I bravely pressure cooked using my pressure canner for the first time. I was petrified of using it, but in the end, it wasn't too hard, and I now have three meals worth of stock added to my overflowing pantry.

So, despite the fact that I'm not a butcher, I managed to grow healthy, happy roosters and turn those three roosters into at least 10 meals for our family, plus bones for the dog and pâté. And not one bit of those roosters went to waste, or left the property.

Happy mini farmers.

Thursday, 4 April 2013

Unplanning the menu

I love the idea if menu planning. Occasionally, I go through a phase of menu planning, which for me, involves scribbling ideas  for the week ahead on the whiteboard or a scrap of paper.  Last year I had visions of one of those lovely homemade menu plan boards hanging in my kitchen, but I never got around to making one, and now I'm glad I didn't - I've unplanned the menu!

You see, the trouble with a menu plan is that, for us, it actually leads to more food waste than not planning the menu.  I find that if I menu plan, I tend to follow recipes more (from books or my own) and use the ingredients required only.  I also make a more set quantity, which isn't always great for our family.  The other thing I do when menu planning is plan a week around a couple of meat meals, a pasta, a rice etc, and end up with a nicely balanced diet, but leftovers that don't always go together (which I may or may not include to eat in the week anyway). 

As you know, we have a decent sized veggie garden, and over the summer (despite the heat and dry), we managed to grow nearly all the vegetables we ate.  As we moved through the season, I started to notice that I had a lot of one veg around at a time, and if I planned a menu, we might not eat all of it, and in fact start to need to buy vegetables that we would have in our garden another time.  It feels wrong to grow vegetables and then let them shrivel in the garden or feed them to the chooks while buying others from the shops.

An article I read recently talked about using all of your garden harvest. It said to harvest something everyday, and regardless of what it is, or how much of it there is, use it for that day. Now I don't think that I can always use all of my daily harvest the day it is picked, but I endeavour to base my meals around what I pick each day (or have put aside from a previous harvest), rather than trying to fit my harvest into my meal plan. We have much less waste this way and end up eating very well and definitely seasonally.  We don't always have 5 different veg on our plates, and some weeks we seem to eat an awful lot of a particular vegetable that is either our glut crop (hello zucchinis in January!) or our only decent crop (currently beetroot).

By unplanning the menu, I can also take advantage of good specials (AKA'chuck outs'). Therefore, if I come across something that will be useful to our family (eg. Free range meat or organic veg on special) I can buy them and fit them into the week ahead, rather than either leaving them (while I buy something full price so that it fits the menu plan) or buying them and then not using them.

So each night's meal is based on fresh veg from the garden, and then supported by any specials I've bought that week, my pantries, fridge and freezer which I keep stocked with simple foods.  As I work at home most days, I begin my day with a garden wander and a harvest - I pick what is ready and check the fridge for remaining veg from previous days.  Then, through the rest of the day, I creatively put together my ingredients with something from the stocks (below) and come up with a suitable meal. 
 
Our stored foods include:
  • Freezer - frozen veg (preserved from the garden), homegrown chicken, the remains of the side of local, free range pork we bought, homemade stock, homemade breadcrumbs, pastry (yep, still buy that one), homemade icecream and some free range meat that I've bought on special.
  • Fridge: milk, cheeses (homemade and bought), butter, homemade yoghurt, eggs from the chooks and a range of jams, chutneys and curry pastes. And also any excess veggies waiting to be used/ 
  • The Kitchen Pantry: breakfast things and then lots if other cooking staples. Flour (for breads, sweet baking, pasta etc), sauces, spices, dried beans and pulses, dried fruits and nuts, baking odds and ends and a few cans (coconut milk, tomato paste and beans for when I run out of time).
  • The Other Pantry: at this time of the year, is being filled with our produce - bottled and dried fruit, passata, chutneys and jams and marinating feta.

As you can see, I'm set up to cook pretty much anything I can dream up to use the produce I have.

I feel like, by ditching the idea of a menu plan, I've turned my back on one of the keystones of good homemaking, but this feels like a better fit, and as we become gradually more and more self sufficient, I think it is an important step in ensuring that we eat mostly our homegrowns.  People who know me may be laughing at this - you see I'm a planner by nature.  But this isn't completely throwing away a plan, but allowing my garden to plan for me each day or two and to allow me to get creative with what I have. I'll still be planning (yes, and writing lists, to ensure my kitchen is stocked well).  This is not just flying by the seat of my pants, this is intentional unplanning.


We've been doing this for a few weeks now, and the meals we've eaten have been mostly really goof, though some have felt like strange concoctions :).  We've eaten slices, curries, mexican inspired bean dishes, vegetarian roast dinners, lovely salads, pastas etc.  My shopping budget has been cut and I've only thrown a very small amount of leftovers and scrap veg to the chooks.
Bean and tomato salad, zucchini slice and naan bread - not the most regular
of combinations, but filling, delicious and it used what we had!

I read lots of blog posts about menu plans - some people plan for a whole season, others a fortnight or week. Some have fancy set ups, and I'm sure there are more intentional unplanners out there too. Where do you fit?

Monday, 18 March 2013

A spread for your bread

Two main environmental concerns have led to nearly all of the changes we've made over the last year or so.

1. The amount of power used in our household (and its source)
2. The amount of rubbish produced by our house.

The second one has led to some of the most obscure changes. Each time I put something in the bin, I wonder - could we change our habits so we don't produce this waste or produce less waste when using this thing. Is there a way I can reuse/recycle of reduce the overall impact of this bit of waste. And frequently, can I make the processed product myself so that it has less impact in terms of materials used in the production and packaging, and is made using more simple ingredients.

One of the things we've changed is our consumption of margarine. I grew up using margarine and not thinking anything of it. We used it for spreading on bread, baking etc and the only time butter ever really came to our house was at Christmas when mum would use butter for the baking. I used to find it frustrating when we would go to a butter using household and I couldn't spread the hard stuff on my bread! Stu also grew up using margarine, so when we started shopping for ourselves, we didn't think twice about becoming another margarine household. Over the years, we started watching our weight and changed to reduced fat margarine, and I used it for everything.

Then last year, I noticed the margarine containers in the recycle bin. And, I started reading labels. That's not a good thing for the case of margarine. It occurred to me that a spread that was made in a lab wasn't the right thing to be putting on our now fully homemade and simple bread. So we switched to butter.

Switching to butter isn't easy. It's great for baking, there is less waste, but you have the tough choice of either popping it in the fridge to prolong its life and ending up with a brick that is useless for spreading, or keeping it at room temp (perhaps in a butter keeper) which shortens its shelf life, but is otherwise great until the temp rises and you end up with a yellow puddle.
Image

So I did some research and experimenting and over the next few months came up with a solution. A homemade spreadable butter. This isn't new of course. You can buy spreadable butter (though it is pricey and comes in plastic tubs) and lots of others have made it too - that's where I was researching. But this is what I do...

In the bowl of a food processor or mixer, put in about 250g of chopped room temperature butter (I use salted and then don't add salt). Add to that about 125ml of warm (not hot) water. Beat. The water being warm helps the water and butter combine. Once your butter and water are really well mixed (it'll take a few minutes, feel free to wander off and multitask), slowly drizzle in about 125ml of olive oil. Keep beating. When the mix is homogenous (that means "all the same", but using big science-ey words brings out the ex-scientist in me and makes me feel like I'm back in a lab!), you're done! Put it into a container and refrigerate.

This spread is a bit firmer that margarine, but after a few minutes at room temp is spreadable. It has no nasty chemicals like margarine and has less fat, and healthy oils too.  It also tastes good!  Enjoy!

Tuesday, 12 March 2013

We've run out of bread....

It's another stinking hot day today. It was predicted to get to 38C in our little part of the world. We have had a record number of days above 30C for March, and even those of us who love summer are just over it! Everything in the garden is dry, brown and crackly. In the last week we've noticed that even plants that were looking fine (like the giant flax) are beginning to wilt and brown off. We've had about 30 drops of rain I. The last 2 weeks and there isn't any coming for a while yet.

Fried plants - this is a "drought resistant" native....

"Please turn off the heaters!"


There is still water in the tanks, but only due to us being extremely water frugal, not because we've had enough precipitation. My animals are all still alive, but they are all panting, we're not getting many eggs and they all look at me as if pleading for me to turn down the heat.


Strawberry plants are just hanging on.
I've just come home from school where i was running our kitchen garden program. We had a great morning cooking with delicious tomatoes and apples from the school gardens. It was hot work though and I'm pleased to be home. Our house feels nice right now - I shut it all up in the mornings and it stays cool for hours, but it will be heating up again soon and the air conditioner (now back in use since we are making the power to run it!) and ceiling fans will be working to make it tolerably hot instead of sweltering! We'll then open it all up again once the heat is out of the day and allow a bit of air in to try to help us sleep through the sticky nights.

So, the weather is causing us all sorts of discomforts and problems. Most problems are obvious and expected, but today's issue isn't one I've really had before. My problem is that we're out of bread. We're big bread eaters (toast, rolls and sandwiches feature regularly on the breakfast and lunch menus) and for 12 months now I've made all the bread we eat. But I just can't justify turning on the oven and heating up the house even more (not to mention standing and kneading dough with sweat dripping). I could get Stu to buy bread before he comes home from work, but we no longer enjoy shop bought bread and it just feels wrong somehow. So now I'm wracking my brains for suitably easy to pack and eat lunches and yummy breakfasts that don't require an oven to make. I'm thinking pancakes, tortillas, fritters or maybe having another go at crumpets. All still need a pan and effort, but no oven. One of these days, it'll be cold again and I'll relish turning on the oven to cook bread and warm the kitchen, but right now, that feels a long way away.

Have you discovered strange problems caused by of made worse by the heat? Any oven-free food suggestions? :)


Monday, 18 February 2013

So much Pizza dough! (and the recipe)

What could be better than sitting in your garden on a balmy Saturday evening with a big relaxed group of your friends and a cold drink in your hand?  All of that with pizza from the pizza oven of course :)

Having now mastered the skill of churning out yummy pizzas from our oven, we decided to invite friends around to share.  With a mixed bunch of friends around - workmates, belly dance students and local friends - we all got down to the business of making, cooking and eating pizzas, all while downing a few cold ones and enjoying the wonderful company.  The kids were up in the trees and the cubby house, chatting the the chooks and dogs and on the trampoline.  The occasional adult joined in the fun (back flips on the trampoline from one very energetic grown up!) and were delighted with the excellent behaviour of all the children. 

Before our guests arrived, our kids handed out important jobs to each of us.  I was on food preparation, Stu was on fire and cooking duties and they were the entertainment crew!  We all excelled at our jobs, if I do say so myself!  I prepared about three times as much dough as we needed, a stack of snacks and my share of pizza toppings, then, together with our guests who all brought along a contribution of pizza toppings, prepared amazing looking and tasting pizzas.  We handed these to Stu who, bright red and covered in sweat from the heat of his amazingly well prepared pizza oven, cooked them in a few minutes.  The first ones in the oven cooked so quickly that they burnt on one side before he could turn them!  But they all tasted good (and the chooks and dogs appreciated the odd crust that was a bit too charred).  The kids did a great job of entertaining the crowd - sharing and playing with all of the kids and occasionally chatting to the grown ups and giving shoulder massages later in the evening.

Of course, no one had time to take any photos of all of this fun, so I can't share any, but hopefully you get an idea of what a great night it was.

Sunday, we declared a day of rest and recuperation after a busy day and night preparing for and enjoying the party.  But my garden had other ideas.  With the fruit and veg ripening at a cracking rate now, I am having to pick, cook and preserve each day.  I peeled, chopped, minced, dried and bottled for most of the day.  It was hard, hot work, but Stu turned the split system air conditioner back on at the switch for the first time since October.  Air conditioning felt like such an indulgence, but with our solar panels producing more than three times the amount of power we usually use, and with us not yet being paid for any fed into the grid, we figured we deserved the indulgence.

Then, faced with huge quantities of leftover dough and pizza toppings (perhaps I did my job too well), we decided to get the oven going again.  This time, we made a huge quantity of mini pizzas that cooked beautifully!  They are perfect lunchbox size too, so after enjoying a couple for tea, I cooled the rest and put them in the freezer for easy lunches for all of us for the next week (and remembered to take a photo!).  Then, oven still hot, I cooked our first successful loaf of bread in the pizza oven (my secret being - cook it in the cast iron casserole pot to give even, moist heat), closely followed by my second successful loaf!  A dozen muffins and a huge nectarine crumble followed the bread. 
Mini pizzas!

With the store cupboard gaining another 14 jars of preserved food, the freezer full, lunches and desserts sorted for the week, I called it a day and took an early night ready for another day of heat and preserving.

I had a lot of requests for my pizza dough recipe on the weekend, so thought I would share it here.  It's from one of my favourite cook books - both for the recipes and the gorgeous presentation - The Thrifty Kitchen.

Pizza dough (serves 2)

(for our family, I make double which makes enough small pizzas for tea and leftovers)

2 1/4 cups plain flour
7g dry yeast (that's one sachet)
1 tsp salt
1/2 tsp sugar
1/4 cup olive oil
3/4 cup warm water

Mix all of the ingredients together until a dough forms. 
Knead for about 5 minutes. 
Cover and put in a warm place for an hour. 
( If I'm doing pizza for tea, I make this at lunchtime and put it in a big airtight container in the fridge for the afternoon.  It still rises beautifully.)
Take a handful or two of dough, knead slightly in your hands and then roll out to use for pizza.
(We roll ours out on wooden boards with a good handful of semolina below the dough.  The semolina stops the dough from sticking, allowing it to be transferred to the oven floor or a pizza stone)
Add a small number of toppings and cook on a pizza stone which has been heated in a very hot oven or BBQ for about 10 minutes.
(or on the floor of your stinking hot pizza oven for a few minutes!)
Enjoy!

Friday, 1 February 2013

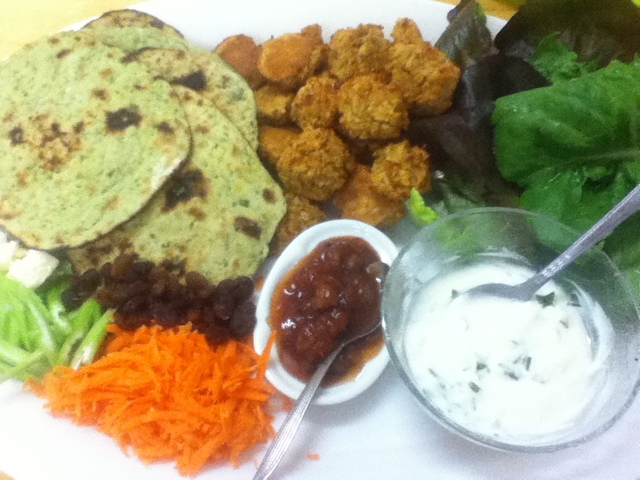
A dal kofta platter

Linda who blogs over at The Witches Kitchen has been writing about platters this year. Beautifully presented, delicious, healthy and seasonal platters of food to share with a friend, the whole family or guests too. We love a good platter at our house. It is casual dining at its very best. Finger foods that can be mixed and matched to suit each diners tastes.

Platters are often used on Thursday nights at our place because Thursdays are busy for me. Last night was my first work night of the year, so a platter was called for and it was so pretty and yummy I just had to share.

Spinach roti from this recipe, made using our silverbeet and garlic and baked in the pizza oven on Sunday night and frozen.

Dal kofta balls from this recipe. I made the whole batch and we have enough balls in the freezer to have as a curry on the weekend with naan that I also cooked in the pizza oven.

Fresh lettuce, celery and grated carrot from the garden.

A simple homemade yoghurt dip/sauce (no recipe, just some yoghurt and herbs thrown together).

And a few other bits and pieces, including a dash of chilli tomato chutney (would have put fresh tomatoes on, but we've still only had one ripen this year).

Yum.


Tuesday, 18 December 2012

Ginger (or chocolate) bread houses (or sleighs)

Last year's mini houses.

One of the things I love about Christmas in our home is that we adopt traditions from all over the world and make Christmas all about us and what we like.  One of those adopted traditions is the gingerbread house.  Back when my kids were very little and my younger brother and sister were small too, I would have the four kids during the holidays.  It was at this time that my then neighbour gave me my first gingerbread house kit.  We had a ball!  I stuck the house together and the four kids attached a huge amount of lollies to it (and rather a lot in their mouths).  We left it on display and then after Christmas, I let them all dig in and eat it.  One of the best things about gingerbread houses is how pretty they look even if you let the kids do it all without any adult views to symmetry and clever decorating.
Our first gingerbread house was a kit version with people etc.

We've made a gingerbread house each year since then, and last year, I made my own gingerbread for the project.  Can I just say - the kits are great, but gingerbread is easy to make and you can cut it however you like and it tastes awesome when you make it yourself!  Last year we made a collection of small houses, some to give as gifts and some to keep for the kids.  They make lovely gifts, but the only downside is that I have friends who don't like ginger.  So this year, we have made some changes to the recipe and have ginger and chocolate bread houses to give away and a sleigh with reindeer that we will put together next week. 

I thought I'd share the recipes and template ideas with you.  I made a batch of each this year and had enough dough to make four of the small houses, 2 reindeer, a sleigh and a large pile of tree and gingerbread man shaped biscuits.

Gingerbread

125g butter
1/2 cup tightly packed brown sugar
1 egg
3 tablespoons golden syrup
2 teaspoons cinnamon
2 teaspoons of ginger
3/4 teaspoon of bicarb soda
2 1/2 cups plain flour

"Chocolate bread"

125g butter
1/2 cup tightly packed brown sugar
1 egg
1 teaspoon vanilla extract
4 heaped teaspoons cocoa
3/4 teaspoon of bicarb soda
2 cups plain flour

Directions for both types

With an electric beater, cream the softened butter and sugar until light and fluffy.  Add the egg and beat well.  Add the other wet ingredient and beat well.  In a separate bowl, sift the dry ingredients and mix well.  Add the dry ingredients to the wet and stir, and then knead with your hands.  The dough will be relatively crumbly.  Form the dough into 3 mounds.  Roll out (with flour/baking paper/your choice of rolling out method) one mound to about 4-5mm thick.  Use your templates to cut out shapes with a knife and then carefully lift the shapes onto a lined baking tray with an egg slice.  Continue rolling out and cutting shapes until all dough is used.  Bake at 180C for 10-15min until just starting to change colour.  Cool on trays for a few minutes and then transfer to cooling racks to cool completely.
Decorating requires tongue sticking out levels of concentration!

Templates

Use cardboard from a cereal box to draw up your templates.  You can then cut them out, lay them on top of the rolled out dough (printed side of the box down) and use a knife to carefully cut around the shapes.  The templates can then be gently wiped clean and put away for next year. 

To make the mini houses you will need:
2 side walls 5cm x 8cm
2 end walls 5cm square with a 3cm tall triangle on top
2 roof pieces 5cm x 9cm
One of this years complete mini houses.

To make the sleigh, you will need:
2 sleigh side shapes
1 big square for the back
1 smaller square for the front
2 (or more) reindeer/horse shapes
Enlarge this image to fit on an A4 sheet and you should be able to use my templates, or feel free to make your own better ones ;)

This image is of my templates.  The bigger square is 8cmx8cm.  Feel free to copy the image and scale in your own program.

To assemble


Make up a batch of royal icing by gently beating an egg white and then beating in about 1 1/2 cups of icing sugar (I use the mixture, not pure) and a teaspoon of lemon juice.  Spoon into a piping bag (or snap lock back with a corner cut off).

Use the chocolate shapes, ginger shapes or a combination of both depending on your (or your gift recipients) tastes.
A chocolate house assembled and ready for decorating.

For the houses, I assemble on a foil covered coaster.  Run a line of the icing along the front of the coaster and down each side where the walls will stand (test the spacing with your pieces first).  On on of the end wall, pipe a line of icing up the back of the wall edges and place the piece onto the line of piping on the coaster.  Quickly glue the two wall pieces into place to hold it up, then attach the back wall.  Use more icing to attach the two roof pieces and fill in the gap in the top with more icing.  Your icing doesn't need to be neat, you won't notice it when you finish the decorating!

I like to give my house a couple of minutes for the 'concrete' to dry, and then go to town with the lollies!  Use whatever you like in terms of lollies, but we particularly like smarties, mini marshmallows and candy canes and tiny teddy biscuits make nice residents :).  Last year we used small chocolate bars cut on an angle to make chimneys and some fruit/musk sticks, and this year we used some licorice allsorts.  Use your imagination and have fun.
Lots of bright lollies make pretty houses.

To make the sleigh, I will join the four pieces and then stand the horse shapes at the front.  They will have pretzel antlers added and I have lots of decorating ideas.  I'll share a picture when its done.


Have fun!

Thursday, 15 November 2012

We built a pizza oven!

One of the things we've been very busy with at our house has been the pizza oven project.  Well it is finished!  Hooray! 
Pouncy thinks he makes a lovely addition to the oven.
It was a great project.  We learnt a lot of new skills and ended up with something that we love to look at and is functional too.  But we're certainly no experts, so I'm not giving a tutorial or anything like that.  But here is our pizza oven story.  Feel free to ask any questions.

Step one was to build the plinth or base for the oven.  We had an existing concrete slab, so we levelled that and built on top.  We used besser blocks for our base.  Can I just say - besser blocks are damn heavy!  And having never laid any bricks before, this was a steep learning curve for us.  But despite our lack of experience and the damn rain, it got done and we were even able to make a fancy arch at the front using recycled bricks and pieces of bluestone that were found on our block (they were from the original school building that used to be here).  It was so exciting when we pulled out the form work and the arch stayed in place.  A thing of true beauty that we just kept gazing at.  Oh, and we tested the safety of it by letting Hurley walk under it ;)

We then had to make a top for the plinth.  We used a piece of cement sheet, held up up with more besser blocks underneath.  We laid a surround of recycled bricks, held them together with some wood and trailer ties (true professionals I tell you!) and then poured a 5cm thick re-inforced concrete slab on top.  Onto this, we smashed a pile of bottles and lay the broken glass and then filled up with sand.  This is supposed to help with insulation.  Onto the sand we added a layer of clay pavers.  Then we tested the safety of this by standing our children on the top hehehe.

 
The next step was so exciting as we were actually building the oven, several weeks after starting!  We made a guide for building the dome, then I built another arch for the door.  The rain kept coming and the tarp was well used.  Finally, Stu built a great big sandcastle, I mean sand dome mold, and the kids played in the sand pile. 

 And then we built the oven.  We used about 60 recycled bricks that had been broken in half.  Just an aside here, the work involved in removing mortar from reclaimed bricks and then breaking them in half is back breaking and really rather unpleasant.  The bricks built up quite quickly, with this step and the next being completed in a day.  We put in our stainless steel flue at this point too, nestling the bricks tightly around it to hold it in place.

To finish off the oven, we used a layer of insulation batts and covered them with a mud mix that we'd put rather a lot of oxide into.  It looked rather too much like chocolate cake mix and I spent the whole time we were doing this bit singing the Crowded House song about chocolate cake (very annoying!).  We ended up using two barrow loads of this mud/concrete mix to get a good coverage.

 Finally, we were done!  We left it for a few days for the mortar to dry and then the only thing left was to pull out the sand.  The kids had a great time doing this and it was lovely to reveal the inside of the oven.  We christened it with a small fire and a curry cooked in it.  It was delicious!

And then, finally, we cooked pizzas in it for the boys birthday party.  Stu is master pizza oven man, and did a great job.  But we discovered we needed to burn a bigger, hotter fire, for longer before we try these again.  Probably also wasn't a great idea to try cooking pizzas for the first time with 22 hungry mouths to feed..... oops!  But it was fun anyway and we plied them with home brewed beer and ginger beer while they waited.

All up, it was a fabulously fun project and for about $500 and many, many hours of hard work, we have something pretty special in our garden.

PS. sorry the pics end up a bit tiny - there were just too many to make them big! :)

Saturday, 29 September 2012

In pursuit of the perfect 'not sausage' roll

Yes, technically it is Screen-free Saturday in our house, and yes, I'm writing a blog post.  We've bent the rules today because it is the AFL grandfinal, and being Victorians (even ones who aren't massive footy fans - well Stu kind of is.....), we feel the need to watch the grandfinal on TV and eat junk food.  It is also atrocious weather, so we can't work outside.  This week we'll have Screen-free Sunday.

So, in grandfinal day tradition, we need to eat junk food of the hot dog, meat pie, chips, sausage roll etc variety.  Of course, I can't quite bring myself to buy these things anymore, so grandfinal day also means baking.

I took a deep breath and bought sausage meat to make sausage rolls for the boys.  I intend to make sausage rolls fit into my 'ok' list somehow, but for now.... I had some puff pastry in the freezer (which it turns out has palm oil in it too.....aaaaaagh!), so the boys are getting a pile of regular (though not especially ethical) homemade sausage rolls.

I can't eat them anymore though... Just can't go there.  So I am experimenting with 'not sausage' rolls.  I've seen this recipe which looks good, but not 'meaty' enough. And a while back I made this recipe.  It has a mixture of chickpeas, carrot and rice in it and uses regular puff pastry.  The boys ate them, though not enthusiastically.  I loved them and plan to make them again one day.  But today I wanted something a bit different. 

Today I made a filling that had borlotti beans (other beans would have worked though), rice cooked in veg stock, fresh coriander, taco seasoning, grated carrot, egg, breadcrumbs and tomato paste.  I didn't measure anything, so I don't have a recipe - sorry! I blitzed all of that in the food processor, and then rolled it in some homemade shortcrust pastry made using this recipe.  I also used the last bit of puff pastry to see which I liked better......
regular meaty sausage rolls take on their vegie friends (all were eaten!)

My delicious not-sausage rolls - they looked great!

The results.....YUM! We all enjoyed them, but they were a smidge spicy for the kids.  As to the pastry, I liked both, but the puff had a more decadent texture, so I'll be hunting for a good puff pastry recipe.  The not sausage rolls I will have to make again and work out a recipe :)

Do you have a good 'not sausage' roll recipe? Or do you make ethical sausage rolls? Please help me out on this quest and share your recipes!

Monday, 17 September 2012

A busy weekend and a stingy experiment!

We have just had a whirlwind of a weekend!

From belly dance haflas and family get togethers to building in the garden.  Today we're all tired, but looking forward to another week of busy-ness.

On Saturday, my teenage brother played in his football grand final.  The boys and I didn't go as we would have had to leave too early in the morning following a late night, but Stu went to support him on our behalf.  Sadly, the team didn't win, but it sounds like everyone had a good morning.

In the afternoon, we all met up at my mum's farm.  They have 50 acres which is mostly taken up with rather a lot of horses (my mum and sister are very into showing, breeding and all things horsey).  But 50 acres is a lot of space for a hobby type of farm, and they also have plenty of other farm animals.  It was a great visit - lots of catching up with everyone as my other brother and sister in law had also come over for the afternoon.   Mum made one of her delicious (if eclectic) feasts and we even managed to chat to my Grandad in the UK via skype.  It was one of those family events that felt comfortable and warm.

I managed to come home with a good range of "souvenirs" too - some poly pipe to support my cucumber arch, some fertile eggs to put under my clucky hen, some straw for topping up the nesting boxes, a dozen duck eggs, a pile of books for me and the bookworm kids and a bag of stinging nettles.  Mum thought I was crazy to turn down her offer of silverbeet and take some of her "weeds" instead, but I've been reading so many things about nettles and watching TV shows featuring them - I just had to give them a go!


A somewhat blurry (sorry!) photo of my nettles.

I didn't get a chance to cook with the nettles yesterday as we were out in the garden getting the pizza oven project started.  This involved fixing the wheelbarrow and then mixing up some concrete and screeding off the top of the old garage slab that we'll be building it on.  We have no concrete experience (other than the odd rapid set in the post hole use), and it took a lot of research to even get to this point, and I'm not sure we've done a great job - but it is done!  And tomorrow evening we will hopefully lay the first course or two of concrete besser blocks that will form the plinth for the oven.  We've found this project interesting so far as there are just sooooo many ways people have built woodfired ovens that we have had to sift through all the books and blog posts and come up with a unique plan that is a combination of all the methods we've read about.  This is going to be a steep learning curve, but the aim is to have it ready for a party we're having in November - fingers crossed and I will keep you posted with updates as we build. 

We were also brewing yesterday - bottling the first batch of alcoholic ginger beer (which smells and tastes divine! Can't wait for it to be finished!), and loading up the fermenter with another batch of beer.
16 bottles of ginger beer..... mmmmmmm.....

Back to the nettles though.  I braved them today and used them to cook tea.  They were actually very easy to use and quite tasty.  I simply put on gloves and pulled the leaves off the stems.  I threw the stems out and blanched the leaves.  The sting is all gone when they are cooked.  The cooking water I tried some of as a tea - it has a real earthy flavour with a hint of fishyness.  I can't say I loved it, but it was drinkable and apparently extremely healthy.  The nettles, I mixed with some finely chopped mushrooms, sour cream and grated cheese and used as a ravioli stuffing for pasta made with mum's duck eggs.  The verdict?  Yum!  They were really good!  And the greeness of the nettles is better than anything else I've ever seen.  We'll be revisiting this weed again for sure.
Nettle and mushroom ravioli ready for folding

How was your weekend? 
Have you ever eaten nettles?  How?