Showing posts with label sewing. Show all posts

Thursday, 4 July 2013

Making and mending

I had to visit spotlight the other week to get a bit if fabric for my brothers birthday present. As it always does, the clearance racks called me and this time, they were loaded with deliciously light and very pretty vintage inspired fabrics. At only $4-8 a metre, I was sucked in and came home with two types.

Since then, my sewing bug has hit and I've been busily stitching away on all manner of projects - it is, afterall, perfect weather for being in with the heater and working on projects for now, for upcoming travel and for warmer days to come. 

I started my sewing bee with this top. The fabric is light as air and the pattern is not only free, but easy and fits me well! Woohoo!  I wore the top for our ladies lunch over a long sleeved tee, but am looking forward to wearing it on its own in warm weather. In the making of this top, I also learnt to make bias binding - oh the possibilities!

My next project was bigger, so I decided to make space and clean up the mending pile. I fixed a bag handle, an umbrella spoke, a hole in the knee of a pair of school pants, an unfortunate hole in a pair of jeans and a shirt that had torn along its seems when Stu ripped if off because a wasp was in it. I also took in and up a pair of pants Stu bought on special years ago, but that we're always too big. They're great pants and will be perfect for travel (now that they fit!). 

I was just about to start on my bigger project when I had a chat to my mum. The conversation included talking about our dog Buddy, who, since losing his brother earlier this year, has been feeling the cold at night. Mum suggested I make him a coat. Half an hour after getting off the phone, I took this picture!

Buddy's custom fitted dog jumper was made using this tutorial from an old work jumper of Stu's. Buddy has been wearing ever since - think I'll have to make a couple more so they can be washed. 

The big project I was working up to was a carry on travel bag for me. Messenger in style, the bag is roomy and full of pockets and clips. I made one for Stu months ago. His is made from fabric I bought as a couch cover from the op shop, lined with business shirt material and decorated with an op shopped belt. The look is smart enough for him to use it when he is wearing a shirt and tie for work, but casual enough for holidays too. 

My bag used the same general pattern, but with a few adjustments - more pockets, a shorter strap (for my somewhat shorter body) and slightly roomier. Mine is more 'me' too - made from a rug I bought at an op shop and lined with some old sheet fabric. 

Both bags have pockets inside and out,including  an elasticised drink holder, a zippered pocket (I used this tutorial to put them in) in the flap and a d-ring sewn inside for clipping keys to so they don't get lost. I'm really pleased with the finished product, and rapt that we have completely unique bags!  I didn't use a pattern for them, but took ideas and inspiration from lots of patterns. (Let me know if you would like a pattern/tutorial as  I'm planning to make one as a gift in the future and would photograph it when I do). 


I'll include a pic of Stu's bag later - he took it to work today!

After those bigger projects, I turned back to doing lots of little projects (for travel and home), using scraps of gorgeous fabrics. 

Bag tags and ear bud holders for all of us and eye masks for Stu and I. 

More sandwich wraps and a few snack bags. 

And then some personalised throwing beanbags for a couple of friends first birthdays....


I up-cycled a couple of opshop tshirts into PJ tops for the kids....


Then there was some more mending and a bit of work on another top for me, but I have to finish the crochet work before its completed. 


My poor sewing machine is exhausted now!  I managed to break several needles and blow the lightbulb in that sewing marathon. 

I'm loving sewing right now though and have a few more projects I want to work on, including felt slippers for the kids and new cholis for my dance troupe. 

Do you sew?  And do you make clothes for your family?  It feels so good to see your family using things you've made, and to receive compliments on clothes that you can say 'thanks, I made it!'....


Monday, 25 March 2013

Sew a mini tissue pack

Head Cold season has hit here. People all around me are full of sniffles, sneezes and coughing. It's gross, but inevitable. I'm still OK, a touch of a sore throat, but fine otherwise. The boys have full on colds though and so the stack of homemade fabric tissues I made last year are getting a workout! I love that using hankies gives no waste, and a massive stack of them means they can go in the wash after each use, therefore taking out the thing that gives hankies a bad name - lugging around a dirty hanky for repeated uses and therefore building up a pocket full of cold germs....ew!

Now I'm no germaphobe, but the snotty hanky in the pocket thing is really yucky, so I don't send hankies to school with my kids, and I don't carry them with me either, so when out and about, we use paper tissues. But being light paper, they're prone to tearing up of you just shove a handful in your pocket. That's why those clever marketing folks creating the mini packets of tissues. Great idea! But they're expensive and wrapped in plastic .... that is nearly as "ew" as the snotty hankies!

I needed a solution, and so this morning, while listening to early morning coughing and nose blowing, I decided to whip up these little mini tissue pouches and managed to make two in about 30minutes AND remembered to take photos* so I could show you how I did it! All before a cup of tea -are you impressed? ;)

 
*my camera has started playing up, so for the time being all photos are being taken on my iPod - apologies for the poor quality.

OK, so here is a quickly put together tutorial on how to make them. They're pretty straight forward, but yell out if anything needs clarifying.

You will need:
  • Some fabric scraps cut into the following shapes (I used pinking shears so they wouldn't fray)
  • One 13 x 9cm rectangle and Two 13 x 6cm rectangles
  • A zip (longer than about 15cm)
  • A sewing machine with a zipper foot, matching thread and the basic sewing gear (scissors, pins, iron etc)

1. Once you've cut out your pieces, take the two smaller pieces and iron over just under 1cm on one of the long sides of each.

2. Pin the folded over edges onto your zip. You want the fold close to the teeth and both pieces of fabric lined up. Make sure the right side of your fabric is facing up. Pin them in the middle of your zip - we'll be cutting off the long ends soon.

3. Use your sewing machine to stitch the zip to the fabric. You will need to move the zipper tag along the way - do this by making sure that the needle is down, then lift the foot and slide the tag along, then lower the foot and keep sewing. Sew both sides so you now have a rectangle with a zip down the middle.

4. Slide the zipper tag down so that it is open about 3/4 of the way down your fabric. Then with right sides together, pin your larger piece of fabric to the back. Make sure your open zip ends are pinned close to one another so the zip will close when it's all sewn up. Note that your zippered section might be a bit bigger than your backing piece. If that's the case, just trim them to the same size.

5. Now simply sew all the way around your little rectangle, making nice neat corners and sewing straight over the ends of the zip.

6. Trim the zipper ends and corners of the rectangle, then turn it all right side out through the zipper.

7. Iron flat and your done!

If your tissue pouch is for school, you might consider ironing on a name tag so it is less likely to get lost (update - Lachie came home tonight "I've lost my tissue case!"  I was furious!  But then a kid knocked on the door, he'd found it and returned it - the name touch was worth it). To fill the pouch, fold tissues in half and then in three, stack together. You should be able to fit in 6 tissues, just stuff in the folded pile. The other nice thing about these pouches is that they can be thrown in the wash occasionally.

Now make one for all your kids in personalised fabrics and a pretty one for your handbag too :). Have fun!


Friday, 28 December 2012

Homemade Christmas gifts 2012

Ok, here it is, the long awaited list of gifts I made for family and friends this year. I've split it up so it is easier to refer to if you want to use any ideas, and where I used a tutorial or pattern from the net, I've linked to it for you. There are photos of some things, but not all. Wanna know how to make anything not linked? I'd be happy to help, just ask!

For Men


For women


  • Crocheted bookmark with some secondhand books
  • Crocheted bracelet/necklace/garland
  • Crocheted beanie
  • Crocheted slippers
  • Homemade soap with a crocheted dish/wash cloth

For couples/families/unisex gifts

  • A hamper with homemade coffee stencils and chocolate shaker, various pickles, Florentines, biscuits, vanilla extract and a crocheted ornament
  • A homemade timber box filled with a variety of home brews (one with and one without a set if photo coasters), we dressed the brews as reindeer for fun!
  • Homemade soap using herbs from the garden
  • Crocheted Christmas ornaments
  • Mini gingerbread houses
  • Homemade PJs for the family (pants from re-purposed bed linen and the tops are made from sustainable bamboo and personalised with bleach paintings)

Kids- babies, girls and boys


*these gifts were used as stocking stuffers for our kids

So that's it! There were a few gifts on the to-do list that I ended up not doing, but will shuffle them onto next year's list. In the meantime, I've started hunting for new ideas to make in 2013. Did you make gifts? Would love you to share your ideas!


Friday, 21 December 2012

Homemade Christmas from the kids

As you know, I've been busy for several months making Christmas presents to give to our family and close friends on behalf if the whole family. I finished the very last gift on Tuesday while watching a Christmas movie (ironically, this gift was the first gift to be started this year and also the idea that started this homemade gift frenzy).  The underneath of our Christmas tree is jam packed with wrapped parcels, and we've already delivered quite a few gifts. So I was already feeling very satisfied before yesterdays advent activity, but it just tipped the scales to thrilled!

The calendar said:

"make Christmas presents for your baby cousin and your pets"

Twelve months ago, I think the boys would've groaned at the idea. It was them afterall who were concerned about homemade gifts when we took on the challenge last year.  Back then, they thought homemade meant dodgy gifts. But after a year of giving homemade, this challenge excited then, and when I explained that I would also be teaching them to use my sewing machine, they were delighted.

I have no photos of them sewing - sewing machines, irons, dressmaking scissors and pins are dangerous enough without me zipping off to photograph the event!  But the boys did cut, pin and sew (with my help) beautiful gifts. They each made a bib for the baby, a fabric gift bag to wrap it in and a toy mouse for their cats which involved both machine and hand sewing.  They wrote gift cards and proudly put their quality, homemade gifts under the tree. Then, being 8 year old boys, they nicked all the fabric scraps and tied them to their bodies as armour before running off to play some complicated wrestling game, leaving me to tidy up!

As well as these gifts, they also made each other a present. They had chosen to buy for each other, and they did, but then they had homemade ideas too! J is the bossiest of the twins, and came up with the idea if making his brother a 'permission pass'.  It looks like a backstage pass, but has a few things that L can choose, like what game they are going to play, or permission to borrow a book from J. It's pretty cute (if a tad dominant).  L made a bookmark for his bat and book loving brother that has an origami bat on the top.

It is lovely to see the whole family embracing the homemade idea. We're all exciting to give and recieve homemade presents this year.   The boys have learnt that a gift made by the hands of someone who loves you is so much more than the sum of its parts. It is a token of time spent thinking about the recipient, love and care poured into a useful and thoughtful item. It is an eco-friendly alternative with less travel miles, no packaging, often made with recycled materials and with only a little bit of child labour ;)  It is a gift to be proud of giving and a gift to cherish recieving.  And (most if the time) the giver gets to have fun making it!

I had wondered if I would continue this challenge next year, afterall, it is a lot of work. But with all the benefits of doing it, I couldn't just stop now.  So next year will be another homemade gift year, and then maybe, many more after.

Friday, 16 November 2012

Eight....

Our boys turned 8 this week. The years are simply flying by, but I must say I love the boys more and more each year, both because that is the natural thing and also because I love the quirky characters that they are gradually becoming.  Little people that still love to be cuddled, read to and pampered by us like little children, but can also be extremely independent, read to themselves, hold intelligent conversations (that are sometimes a little too smart!) and are simply funny.

For last year's birthday, we invited a hoard of children for a round the world party. It was a huge success and we all enjoyed it, but this year I insisted on a quiet, family party. We held the party on Saturday and while it was a family party, it was far from quiet! We invited the local family, but also family from further afield and some adopted family with children the boys' age. We kept most of the invited guests a secret from the boys who were delightedly surprised as grandparents, aunts, uncles, cousins, friends and great-grandparents kept arriving. With 22 people all up, it was a great party! We cooked pizzas, ate and drank homemade treats, played pass-the-parcel (adults and kids together) and thoroughly enjoyed being outside in our pretty spring garden in the sunshine. And the boys received a pile of wonderful presents. In fact, their entire birthday wish list was granted by family.
From our 3 month old niece to my Grandad visiting from the UK, everyone had fun with pass-the parcel. 
And my friend, Jayne, was delighted to win the game for the first time in her life.

So when Tuesday came, their actual birthday, I was a bit concerned about how they would receive their homemade gifts from us and each other. I shouldn't have been worried though, they love them.

We set up a treasure hunt ('birthday quest') for them and they scrambled through the clues to find their homemade bow, arrows and quiver with a pillow shield made up to replicate Tom's shield from their favourite book series, Beast Quest. One of the things we, as parents, love about this series is the lack of merchandising. This means less 'I wants', but also opened up the opportunity for some unique, homemade gifts. The boys are really pleased with them, particularly the bow and arrows.
Appliqued tokens on fabric with belt arm loops on the back and stuffed with soft pillow stuffing,
these shields mean the boys can imagine playing Beast Quest, and if they get hit with a sword or arrow, it won't hurt :)

Simple bow made from flexible branches, string and duct tape with a quiver (fabric covered PVC pipe with a strap that velcros around them) of felt tipped arrows.  They really work, but hopefully won't take out any eyes.

And for each other, they made Harry Potter wands with special bags (sewn by me, decorated by them). They think they're pretty special too.
The wands were made using a chopstick, a hot glue gun, beads, paint and imagination.
Glad they don't work though as their favourite spell is Avada Kedavra.......

It can be hard to make for kids in such a materialistic world, where new toys come on the market constantly and advertising (and school friends) make their list of "I wants" extensive. By making gifts that met the boys interests, I was able to tap into their desires, while staying homemade, simple and eco friendly. Happy all round.

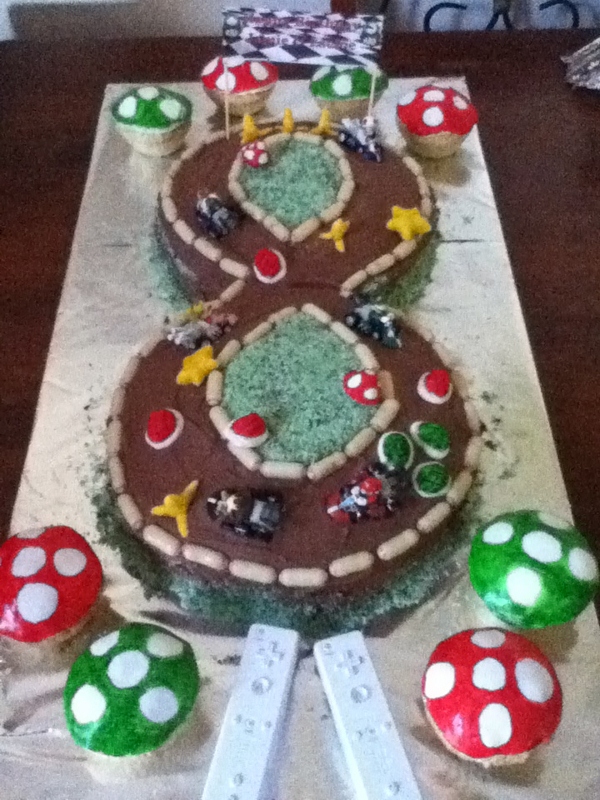
Oh, and I made them a birthday cake for the family party too. I'd had always wanted to make a figure 8 racetrack cake for their 8th birthday, and was granted permission. But I made it a bit more modern and special with a surprise Mario Kart theme. It was dubbed 'the best cake ever'!
Now I can't wait to give them their homemade Christmas presents, and hopefully keep this homemade tradition going for many more years.

Thursday, 28 June 2012

12 months of Greening - January - Less waste part 2

Yesterday I talked about how we were working to reduce our household waste back in January.  We reduced a lot of the general waste and recycling, but also noticed a lot of single use products that we were using - mostly made of paper - and were also keen to reduce that waste.  Today I'm going to talk about that.

DISCLAIMER- In this post I'm going to be talking about replacing some personal hygiene products with cloth alternatives. Some of you might not want to know about this - if that's you, stop reading now and don't say you haven't been warned :-)

Cloth nappies

No, my 7 year olds don't wear nappies, so we don't use cloth nappies anymore, but we did.  We used lovely flat terry towelling nappies until the boys were 6 months old.  We then had a break from clothies as we moved house twice and were seriously sleep dperived, but picked them up again a few months later when we discovered modern cloth nappies.  We were big fans of fuzzibuns back then as the market for SAHM made nappies wasn't so big.  I loved the cloth nappies!  I didn't mind washing them, and except for the occasional leakage problem when the boys grew or changed (which would also happen with disposables) we had no problems with them.  Plus, how cute is a baby bum when clad in a cloth nappy?!

So we didn't bring in Cloth nappies this year, but I mention them here because I realised that if cloth was good enough for our precious babies' bums, then it was certainly good enough for some other uses..... here's what we've done.

Tissues

We used to have a box of tissues in every room. They'd be used for wiping noses, cleansing my face, mopping up and whatever else we could think of to do with them.  At times, you could look in our kitchen bin and find it piled up with scrunched up little white pieces of paper.  No more.  We have a single box of (100% recycled) tissues in the house in case a guest wants to blow their nose and that's it.  I found a collection of flanallette bunny rugs in the shed from when the boys were babies and cut them into two sizes with my pinking shears - small for my face cleansing, and larger to be our s'not paper tissues (yeah I know, we're hilarious!).  I made enough so that they don't need to be carried around like hankies often are, but are single use and then go in the wash.  Unless they are really dirty, they just get chucked in with the other washing, line dried (which kills any germs) and then folded back into their convenient basket. Simple, green and very cost effective!

S'not paper tissues drying in the sunshine

Dishcloths

I used to buy and use sponges and scourers for my dishes, use them for a couple of weeks and then toss them in the bin.  Not anymore.  My friend knitted me some dishcloths and I crocheted a few too, so now I have a lovely collection of washable dishcloths that do a much better job of cleaning than anything I could buy and then throw out anyway!

Paper towel

I never used much paper towel, but it was always there for the occasional spill/grill clean, and we had paper napkins on the table.  So, I replaced these with a set of homemade cloth napkins made from a vintage sheet.  With regards to the paper towel, we use rags to clean up most messes, but for some things, like cleaning the fat from the grill, we use a paper flour bag or similar that has already been used anyway.

Girly stuff

I bit the bullet and went cloth with my menstrual pads too.  I bought some made by a SAHM on ebay and then I made myself some using recycled fabrics.  I was a little dubious, but I LOVE them!  I used to have to buy a certain more expensive brand of pads as I reacted to something (don't want to think what) in most brands.  Now I don't have to worry about that because my pads are simple, clean fabric that has been washed in my homemade laundry powder!  They also fit well because I made them to fit well what could be better than that!?  I did find that they move around a bit when I'm excercising, so I also bought a menstrual cup.  My total cost outlay for my "kit" was about $60, which will have been well paid off in 6 months worth of savings.  And do I mind washing them?  Not at all, easier than nappies.

In the toilet

The only change we made in the toilet was to use strictly 100% recycled toilet paper.  I've hinted several times that we could try cloth, but am not being met with much enthusiasm from the rest of the family..... perhaps next year.

All in all, our changes here have saved an awful lot of landfill.  We might use a little more electricity and water in the washing, but the items slot in with normal washing, so it is negligible.  Plus we only wash in cold water and have water tanks that are nearly always full anyway, so the cost isn't worth considering. 


Have you made cloth changes?  Do you have any other suggestions? 
I'd love to hear your thoughts.

Friday, 22 June 2012

Guilt free shopping

Welcome Down to Earth-ers!

Hello!  Welcome to everyone popping over from Rhonda's blog!  I love Rhonda's "Weekend reading" posts, so feel very honoured to be a part of one.  I've filled up the tea-pot, so help yourself to a cup and have a look around.  Then come back often - I love visitors! :)

~~~

I have two big bad addictions - chocolate and shopping.  The first is fairly self explanatory, and we won't go into that, but shopping is a problem for someone who chooses to live on a tight budget and in a small home.  Not that I've ever been an extravagant shopper, but I am a sucker for the clearance racks and catalogues full of "bargains".  I'm reminded of this a lot this month as it is Toy Sale month.  Usually, in June, I've been around collecting all of the big shop toy catalogues and am busily browsing them with the kids and then buying "bargains" for birthdays and Christmas (that more often than not are not really wanted in 6 months....).  But not this year..... I have changed my ways!
image from http://theramblingsofamummy.blogspot.com.au/

Back in January, I made myself not buy anything for a month (other than groceries).  I didn't go to the shopping centres or down the street for a browse and I didn't go into opshops (thrift/charity stores) either.  I did really well and at the end of the month had a short list of 3 items that we needed to buy.  I think of all the things I probably would have bought and that I then saved on by not going, and I'm very pleased!

I'm allowed to shop again now, but I've gone right off the regular stores, and instead spend my shopping time (and dollars) in the local opshops.  Mum used to take us opshopping as kids, my best friend and I opshopped as teens, and as a mum of babies, I loved the opshop for toys and baby clothes.  Now I browse the opshop for craft items, household items, books and puzzles for the kids and clothes to wear or for repurposing/upcycling.  I still try to stick to the "needs" and less of the "wants", but at least with opshops, I don't feel so bad.

Opshops are great for so many reasons....

  • By spending there you are usually helping a charity.
  • You spend a very small amount of money to get your shopping fix items for your home
  • You are recycling items that were no longer any use to someone else
  • You never know what you'll find and the items are changing all the time
  • You often find fabulous vintage/retro/antique items for a fraction of the price they are sold elsewhere.
  • And if you buy to much (!) you can always donate the excess back and feel good for just making a financial donation :P

I wanted to share a few of my recently thrifted items with you now.
a sweet (and shiny - sorry) little teapot ($1)
no - not the dogs!  The sheets I used to crochet this rag rug for the kitchen (I used two at $2ea)
(but how cute are the dogs - Buddy and Hurley, they felt the need for some blog stardom)
In this photo you can see my roman blind, made from a vintage opshop sheet ($2), another sweet teapot hanging on the pot rack ($1) and my spice rack on the wall which I bought still in the 1970's box and complete with all the bottles and stickers ($5)
A beautiful and practical cast iron meat grinder ($8)
 
An antique sewing machine table/cupboard ($60).  It also came with a vintage sewing machine (not the original) but it wasn't in working order, so I have taken it out and will pass it on to my brother to "play" with.

There have been many more items lately, some not from opshops, but from vintage shops, garage sales and markets too.  I love buying second hand......

Do you opshop?  I'd love to see some of your favourite opshop purchases.  If you write a blog, perhaps you could write your own post on them (and link back here, I don't know how to do a proper bloggy party yet, but that'll work!)

Thanks so much for visiting! :D

Thursday, 21 June 2012

Six months worth of homemade gifts

This year, I made the commitment to give ONLY homemade gifts for 12 months.  I've tried homemade gifts sporadically over the years with limited success, but this year I made it clear to everyone that I was making all the gifts and have made some really beautiful things and been really happy with the reactions so far.

I decided to make the gifts for a few reasons.  1. it is usually cheaper.  2. it is nearly always greener (particularly when you can use recycled materials) 3. I can get most of the gifts without a trip to the shops and 4. the gifts are more personal

I thought I would share with you what I've made - if you want to know how I made any particular item, let me know, I'm happy to share! :)

(I'll post each one individually as I make them in the future - this post is very pic heavy!)

Gift 1 - Personalised photo coasters for my Father in law


Gift/s 2 - a CD/DVD case and a funky vase for my sister's 14th birthday


Gift 3 - Cotton dishcloths as a housewarming present


Gift 4 - Upcycled woolen cap for my Stepdad's birthday

nice modelling Stu! xo
  
Gift 5 - Rosemary Cedar and Mandarin handscrub with a bamboo washcloth for a friend's birthday

love this photo taken on our rustic kitchen floor before it was polished!

Gift 6 - A cupcake pincushion for a friend (and a framed pincushion for me!)


Gifts 7 (there have been about 4 of these) - presents for boys who have invited my kids to their parties - juggling balls and trinket keepers


Gifts 8 (there's been about 3 of these) - presents for girls whose parties the boys have gone to - girly trinket keepers and crocheted hair clip and headband sets

(oops!  no photos!!)

Gift 9 - upcycled vintage pillowcase showing bags for mother's day


Gift 10 - a recycled magazine bowl for a friend's birthday
this isn't my bowl, but looks a lot like the one I made

Gift 11 - an upcycled tshirt bangle for a friends 16th birthday (delivered with a jar of homemade spicy nut mix)

Gift 12 - a roll up/wall pocket xbox game storage thingamy for my brother's 16th (also delivered with a jar of homemade spicy nut mix)


Gift 13 - a crocheted mohair cowl for my mother in law's birthday

Gift 14 - a sewn clutch/handbag for a friends birthday

Gift 15 - a nappy stacker (full of our hand me down pocket nappies) for my brother Sister in law's  unborn baby
(gah!  no pics for any of those!)


I think that is it so far!  My hubby and kids got in on the theme for my birthday too and put together a homemade foot spa for me - love 'em!


Do you make gifts?  What do you make?  Would love some new ideas!!