What you need:
- 2 big silverbeet leaves (or the equivelent of spinach or other greens - try rocket, basil........)
- 1 large egg (if you make this without the greens, use 1 regular egg per 100g flour)
- 200g plain flour (use 00 flour if you like, but this works fine)
- extra flour
- some cold water
How to do it:
- Remove all of the stems from your silverbeet and then cook it in some boiling water. Drain and chop the silverbeet finely (or puree in the food processor if you want less spotty/rustic pasta).
- Weigh your flour and put it in a pile on your (clean) bench top. With a spoon or your hand, spread the flour out to make a large bowl/well in the centre.
- Add your chopped silverbeet to the well and crack in your egg.
- Use your spoon to mix the wet ingredients into the flour, bringing in the flour from the bowl gradually. Once your ingredients have started to come together, ditch the spoon and use your hands to bring it all together. Depending on how wet your silverbeet was and how big your egg was, you will need to add some cold water. Add it slowly, kneading the dough as you go.
- Once it all forms a dough, knead it until it is nice and smooth (and spotty!). Pop your dough in the fridge (covered with a damp serviette or, if you must, plastic wrap) for at least 1/2 an hour or until 1/2 an hour to an hour before you want to eat.
- I don't like to dry my pasta, so I make it fresh and then chuck it straight in the pot, but you can dry your pasta to use later by hanging the strands over a rack (or any clean stick hanging in your kitchen). Just be sure to dust it with plenty of flour or it will stick to the rack.
- Because I use my pasta straight away, I prepare the sauce in advance and have it simmering away ready to go as soon as the pasta is cooked.
- Back to the pasta.
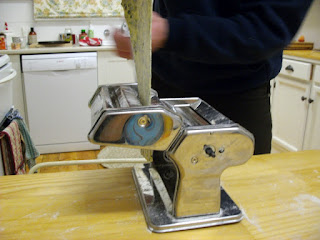
- So, take your dough out of the fridge. Cut it in half and roll out flat. With your pasta maker set on the widest setting (1), you need to laminate the pasta. Roll it with the machine, fold it in half and then roll again. I fold and roll, fold and roll about 6 times. You'll know it is ready because the pasta become nice and silky smooth.
- Then you gradually roll the pasta thinner. For fettucine, I like to go up to the 6 or 7 setting on my pasta machine (go thinner for ravioli etc).
- You will find that your pieces will get rather long as your roll them out. Just cut them in half as needed. I'm not concerned if my pasta is variable in length, so I don't worry about exact lengths.
- Once the pasta is all rolled, attach your cutter to the machine and switch the crank handle across. Dust your pasta well with some more flour before you cut it to stop it all sticking together as it comes through. Feed the dough through the cutter and voila! Fettucini (or spaghetti if you used the thin cutter).
- I pile my cut pasta all over the place then while my lightly salted water comes to the boil. Once your water is at a rolling boil, add your pasta and give it a stir. It will swell slightly and rise to the top when it is cooked (about 2 minutes). Be careful not to overcook your pasta or it will feel waterlogged and a bit gluggy.
- Drain and serve with your sauce and some parmeson cheese. Feel free to look smug while serving it and gloat a little while you eat ;)
-
A note about pasta machines: If you don't have a pasta machine, you can hand roll and cut it. Have fun with that. I've done it before and the pasta tastes great, but its hard work and it never looks great. I have a cheap pasta maker. After a few years of relatively regular use, it is starting to fall apart a bit. Nothing un-fixable, but I've just picked up a replacement for when it really dies. Mine cost $10 from Kmart I think, and there are often some at Aldi or other discount shops. By all means, spend more if you like. As to the electric ones, I really don't see the point for home pasta makers. The winding of the crank is soothing and fun (kids love to help too) and I don't think the electric ones or worth the extra dollars for the time you save. Your choice though!! :)

.jpg)


This looks so yum. When we finally get chooks and as such access to soy free eggs, I'm so looking forward to making my own pasta :-)
ReplyDeleteI love freshly made pasta too - the kids love to be on the pasta machine handle....usually winding the wrong way lol
ReplyDeleteThis looks great and makes me want to give pasta making a try for myself.
ReplyDelete